| View previous topic :: View next topic |
| Author |
Message |
Alarien


Joined: 25 Feb 2008
Posts: 33
|
 Posted: Mon Feb 25, 2008 2:40 pm Post subject: Low-tech no-solder hardwire for Les Paul frets Posted: Mon Feb 25, 2008 2:40 pm Post subject: Low-tech no-solder hardwire for Les Paul frets |
 |
|
This was done with an Xbox 360 Wireless Les Paul. For PS3 USERS you can do this, but SEE AZZRIEL'S POST BELOW FOR PROPER WIRING.
I in no way take credit for coming up with this. After I started having problems, I read the soldering fix and thought maybe this would work, but I waited until Snake2 and someone else said they did it. My red button was pretty much dead. I tried shims and moving the contact board forward, but they were only partial fixes, since the pins and drilled through some of the contact plating already.
This involves simply removing the contact boards and twisting wires in between the two remaining ribbons. It WILL void your warranty, but if you're like me, then your warranty is already a moot issue. Before you do it, you should make sure any problems you are having are due to the removable neck. If you start to lose fret function, and can get it back by wiggling or pushing the neck in or out, then it's a good bet that this is the problem.
Before you go this far, I also recommend moving the contact plate forward in the neck (there are a couple posts/googles on how to do this), or trying a shim/whatever in the neck first. The only problem with those is that they may only be short term, as the pins may eventually drill through the contact plate, as mine did.
You will need a T10 Torx screwdriver ($3.50 at Sears), a few feet of wire (I used 22 guage solid core copper $4 at Radio Shack), some electrical tape, and a wire stripper ($8 at Radio Shack). Don't try to do this without a wire stripper, like I might have been tempted to do a while back. There's not enough room on the ribbons for screw ups.
First, prep 8 pieces of the wire you bought/have by cutting off about 8 pieces to around 4 inches and stripping about 1/3 in. off the end.
Then, remove the neck from the body and remove all the screws. Pick up the green contact plate at the end of the neck and take note of the 1-8 arrangement of the wires. If you have the top of the neck down and the open end is on your right, then 1 will be the closest end of the ribbon to you and 8 will be farthest away. I recommend marking each wire with a marker. Once you have that done, cut the contact plate off and carefully separate each of the wires from the rest of the ribbon with your fingers. Be careful not to pull too hard on the ribbon so you don't break any wire internals or pull them from the button's plate. Then strip about 1/3 in off the end of each of the ribbon's wires. See below:

What I did then is take the very small ribbon wire and twist it around the stripped end of the solid core wire at least twice around and then bent the copper wire back on itself, making a tight hook. Then I just bound the thing up as neat as I could in electrical tape. Repeat this until all 8 wires of the neck ribbon are extended:
Now, take out the batteries, and carefully remove all the screws from the back of the body and slowly separate the body halves. If you get stuck, it's probably the little button that holds on the face plate. Don't pull hard separating the halves either, there are wires that connect them that you don't want to mess this.
Once you have the body opened up, mark the wires running to the pins (again, if you have the neck part of the body on your left, then the 1 wire will be closest to you), cut off the pin plate from the ribbon and gently separate and strip each of the wires.
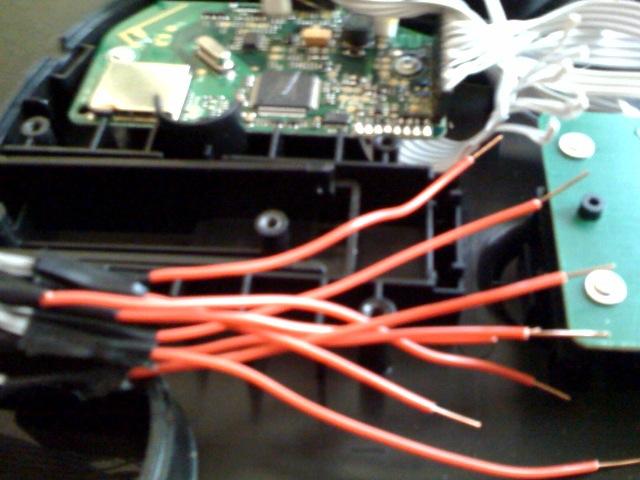
I recommend (if you are like me and right handed, with the neck of the guitar on your left), working from the 8 wire to the 1 wire when connecting your extended wires from the neck, to the ribbon in the body. Be really gentle here. You don't want to break any connections in the neck wires or pull the ribbon off it's remaining contact plate. Just do whatever you did to extend the neck wires.
It'll look something like this when done:

When you go to put the whole thing back together, depending on how much extra wire you have, you probably won't be able to have the neck far from the body when assembling, possibly even partly inserted, so put the cover back on the neck first, being careful not to pierce or pinch the wire or any ribbons (I highly recommend cutting off and shaving down those stupid little 3 prongs that were supposed to hold the ribbon in place. They mostly are just there to damage your ribbon. Faulty design. Once the neck is assembled (don't put ALL the screws back in until you test the whole thing :P) put the cover back on the body and snap the neck down, being careful not to jam the wire bridge too much. Softly pushing should push it all into a stable position.
Once the whole thing is assembled, the wires bridging the ribbons should be pretty well stable, so unless you start channeling Pete Townshend, you should be pretty safe to dance around without causing anything to fall apart.
I tested mine for about 4 hours following doing this and did not have a single fret failure, so it seems nice and stable. At least, that's 3:45 hrs longer than it might have gone with just the contact plate moved forward on mine, so I'm pretty satisfied.
Obviously, you choose to try this, it's your responsibility. Don't shock yourself and be aware of the warranty loss. Whatever you do is on you. :P I'm just one of those people who's warranty was up and even if it wasn't, I don't want to get it replaced just to get another that will fail in 3 weeks again.
Hope you have some success. The whole things takes about 90 minutes.
Last edited by Alarien on Wed Feb 27, 2008 2:40 pm; edited 2 times in total |
|
| Back to top |
|
 |
Gotsmack 


Joined: 01 Apr 2007
Posts: 1693
Location: Manassas, VA
|
| Posted: Mon Feb 25, 2008 8:08 pm Post subject: |
|
|
The only issue I have with this is you used solid core copper wire. It's a lot more rigid and harder to splice with. I recommend anyone attempting this to use a thin stranded wire thats much more flexible.
Good job though. |
|
| Back to top |
|
|
IWillKickU


Joined: 06 Dec 2007
Posts: 2830
Location: In the Undertow
|
| Posted: Mon Feb 25, 2008 8:30 pm Post subject: |
|
|
| Gotsmack wrote: | The only issue I have with this is you used solid core copper wire. It's a lot more rigid and harder to splice with. I recommend anyone attempting this to use a thin stranded wire thats much more flexible.
Good job though. |
I agree. I tried using a low gauge solid copper for my star power pedal, and it led to alot of problems down the line, some of which I could not resolve. |
|
| Back to top |
|
|
Alarien
Joined: 25 Feb 2008
Posts: 33
|
| Posted: Mon Feb 25, 2008 9:31 pm Post subject: |
|
|
If I run into problems, I'll try switching them out. Thanks for the heads up. Ideally, I would think 30 gauge would be best, but finding it in my immediate area was a bit of a pita.
There was one big benefit I found in using the solid core, though, and that's for those with less experience in doing this stuff, I found that the stiffness of the copper core meant it was easier to twist the very thin ribbon braid around it tightly without having to break out heatshrinks, caps, or any other method of holding them together. It was also a bit easier for me to work with, since I have relatively large hands. |
|
| Back to top |
|
|
neonbobo
Joined: 25 Jan 2008
Posts: 44
|
| Posted: Tue Feb 26, 2008 3:34 am Post subject: |
|
|
| i have my ribbons out and cut but i ran into a prob i have only 6 wires on the body side and 8 on the neck? have you ran itno that? and any ideas on how to fix it? |
|
| Back to top |
|
|
cpowlus


Joined: 04 Nov 2007
Posts: 175
|
| Posted: Tue Feb 26, 2008 4:00 am Post subject: |
|
|
| great tutorial. this should help people who aren't interested in learning how to solder. |
|
| Back to top |
|
|
snake2

Joined: 11 May 2007
Posts: 285
|
| Posted: Tue Feb 26, 2008 3:24 pm Post subject: |
|
|
i used 30 gauge solid wire when i did this. my only soldering was in high school and i had trouble soldering to the small pads so i decided to just try wiring and it worked. i figured i couldn't screw up my guitar anymore than it was
_________________
|
|
| Back to top |
|
|
Azzriel

Joined: 23 Dec 2007
Posts: 6
|
| Posted: Wed Feb 27, 2008 11:32 am Post subject: |
|
|
ATTENTION PS3 USERS
There is a slight difference in the PS3 Les Paul that comes in the bundle. On the PS3 there are the same 8 wires in the strip running down the neck of the guitar but the strip running from the main board in the base of the guitar only has 6 wires. The solution is:
Wire 1 - Green - X or listed as CRO for cross on main board
Wire 2 - Ground - GRD on main board
Wire 3 - Blue - TRI on main board
Wire 4 - Orange - L1 on main board
Wire 5 - Ground - GRD on main board
Wire 6 - Yellow - SQU on main board
Wire 7 - Red - CIR on main board
Wire 8 - Ground - GRD on main board
Combine all 3 wires 2,5 and 8 with the GRD wire on main board. Worked like a charm. |
|
| Back to top |
|
|
Alarien
Joined: 25 Feb 2008
Posts: 33
|
| Posted: Wed Feb 27, 2008 2:39 pm Post subject: |
|
|
| I'll edit my post above to direct PS3 users down. |
|
| Back to top |
|
|
dAAAnty
Joined: 30 Oct 2007
Posts: 2
|
| Posted: Fri Mar 07, 2008 1:57 pm Post subject: |
|
|
i never post here so no one is gonna know who i am, but i did this mod last night.
i used 24 gauge wire and it worked like a charm. a friend of mine grabbed the wire for me and it turned out to be speaker wire lol, but it still worked.
played it for about 2 hours and had no problems with the frets. great tutorial. |
|
| Back to top |
|
|
theruler2k4
Joined: 06 Mar 2008
Posts: 5
Location: phily
|
| Posted: Fri Mar 07, 2008 4:07 pm Post subject: |
|
|
| also instead of using electrical tape it would be alot better if you used heatshrink tubbing |
|
| Back to top |
|
|
FrankieB

Joined: 27 Nov 2006
Posts: 3413
Location: Lexington, KY
|
| Posted: Fri Apr 04, 2008 12:32 am Post subject: |
|
|
I just wanted to go ahead and say that I had an orange button die out on me and I was nervous as all hell thinking about having to solder things. But I stuck with this method instead and the guitar is working better than it did when I got it. The buttons are WAY more responsive than they were before.
Thanks a bunch man.
_________________
|
|
| Back to top |
|
|
Ajs

Joined: 26 Jun 2007
Posts: 163
|
| Posted: Tue Apr 08, 2008 1:32 am Post subject: |
|
|
My friend and I both attempted this tonight, and apparantly we both did something wrong... and it looks like the exact same thing >_>
The Green, Red, and Orange frets all work normally, but Yellow and Blue do nothing on their own. If we hold down Red and Yellow, it thinks we're holding Red and Blue, and if we hold Red and Blue, it thinks we're holding Red and Yellow. We both get the same thing :\ Does anyone know what we might've done wrong? |
|
| Back to top |
|
|
IWillKickU
Joined: 06 Dec 2007
Posts: 2830
Location: In the Undertow
|
| Posted: Tue Apr 08, 2008 12:41 pm Post subject: |
|
|
| Try switching the the yellow and blue wires. You may have connected them backwards. Also keep in mind that the wire schematic is a little different from the 360. Make sure you were following the right scheme. |
|
| Back to top |
|
|
ccmoose

Joined: 26 Jun 2007
Posts: 1170
Location: Houston, TX
|
| Posted: Wed Apr 09, 2008 11:55 pm Post subject: |
|
|
| YEEESSSS!!! Thank you! It worked perfectly for me! |
|
| Back to top |
|
|
|
|
You cannot post new topics in this forum
You cannot reply to topics in this forum
You cannot edit your posts in this forum
You cannot delete your posts in this forum
You cannot vote in polls in this forum
|
Copyright © 2006-2024 ScoreHero, LLC
|
Powered by phpBB
|


